
Being an instructor is a very rewarding role. Your students are always so thankful and appreciative when you help them achieve a new milestone in their flying skills. The job of teaching new pilots also comes with some challenges. Primarily, we have the burden of providing well-planned and well-executed training flights for our trainees.
When we, as mentors, become flustered because we have overlooked something (maybe as simple as making sure that the transmitter batteries are charged), it can be disconcerting to a fledgling flier who is probably already in a state of heightened anxiety.
We want to convey that the pathway to competency in this hobby is fun and achievable, rather than a series of unpredictable snafus. The best way to send that message is by being well prepared and confident in ourselves.
I’ve been an unprepared flight instructor more times than I care to admit. The first training day of spring has been a recurring example. Typically, the training airplanes have been in storage all winter. I have often found myself looking through the clubhouse for the correct transmitters while also wondering if anyone had inspected the models. Is that a chip in the propeller? Are these rubber bands dry-rotted? Did I bring the right batteries?
I’ve always managed to pull things together to complete the training session; however, I have often felt like I was flailing.
There is no question that my students sensed some of my anxiety. Frankly, they deserved better.
Being Better
My buddy, Lee Ray, recently proposed a few ideas for making his flights as an instructor more effective. Lee’s primary motivation for developing these ideas was EAA AirVenture Oshkosh in Oshkosh, Wisconsin (the largest full-scale air show in the world!), where we are among the AMA volunteers who provide hundreds of introductory flights to aspiring RC pilots each year.
Lee’s ideas are simple and intuitive, and they do not deal with any specific teaching methods. I think that most instructor pilots already have preferences for how they teach. Lee’s ideas are about the things that we can do to be better preparedas instructors. They help us set the stage for more-effective training sessions.
We implemented these ideas for AirVenture and made a few minor tweaks on the fly. I can confidently say that this resulted in a much smoother and more consistent experience for the instructors and students compared with previous years. I was so impressed that I subsequently applied the same strategies at my home field, the Green Bay Model Airplane Club (GBMAC), in Green Bay, Wisconsin. I think that you will find these tips helpful for your club’s training efforts too.
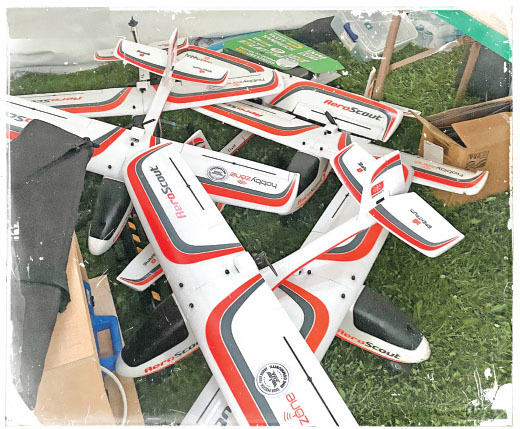
The model that we use for orientation flights at AirVenture and GBMAC is the HobbyZone AeroScout S 2 1.1m. It has proven to be a durable and docile platform for beginner (and experienced) pilots; however, the strategies outlined here can be applied to any trainer you like.
Organize
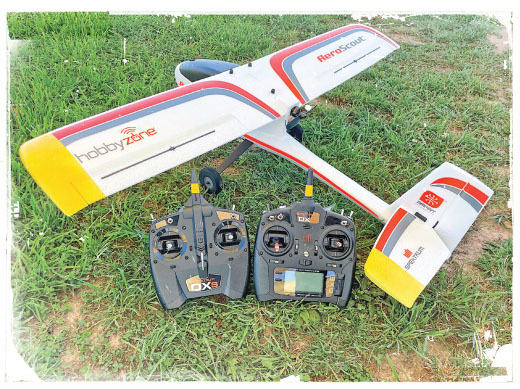
There are three key pieces of equipment involved with flight training: the aircraft, the student’s transmitter, and the instructor’s transmitter. If you’re dealing with multiple models for training, or even just other gear on the flightline, knowing which equipment you’re supposed to use can become befuddling very quickly. A simple way to avoid this confusion is to color-code matching components.
At GBMAC, we have two AeroScouts that we call "Red" and "Yellow." The student transmitter for Red has a band of red electrical tape wrapped around the base of the antenna, as does the instructor transmitter. The transmitters for Yellow, as you might have guessed, have bands of yellow tape.
For the three AeroScouts we used at AirVenture (Red, White, and Blue), we identified the airplanes by simply wrapping the appropriate color of tape around one of the main landing gear legs of each airplane. I took things one step further with the GBMAC trainers and painted the left wingtip and horizontal stabilizer of both models. Choose any approach you like, as long as there is never any confusion about which transmitter goes with each airplane.
The instructor transmitters can have multiple model profiles, so we made sure that the profiles we configured for the AeroScouts were given blatantly obvious names. Using "AeroScout" is ambiguous, but "GBMAC Yellow AeroScout" leaves nothing to chance.
If you also have dedicated batteries, chargers, or any other equipment for your training fleet, it makes sense to mark them appropriately. Misplacing any one of those items could ruin an entire day of training.
Familiarize
Once we had all of our equipment clearly organized, we invested some time in getting the AeroScouts configured just how we wanted them. Although both Lee and I were already very familiar with and comfortable training using the AeroScout, we wanted to make sure that we were prepared to handle any situation that could arise.

Once we had all of our equipment clearly organized, we invested some time in getting the AeroScouts configured just how we wanted them. Although both Lee and I were already very familiar with and comfortable training using the AeroScout, we wanted to make sure that we were prepared to handle any situation that could arise.
First, we set up the airplanes as stand-alone models (no instructor transmitter). This allowed us to find the center of gravity location that we liked, set the flight trims, and verify that everything worked as expected.
Our next step was to configure the instructor transmitters using the wireless trainer feature of the radios. There are many options within the wireless trainer menu. The specific configuration we chose is not important here. Choose the setup that you are most comfortable with. I will share that limiting the student controls to channels one through four helps to minimize variables during training flights; otherwise, things can get exciting when the student accidentally bumps a switch and mysteriously ends up in the expert flight mode!
We invested considerable time aligning the flight trims between the instructor and student radios. Our goal was to have no change in the trim when control was switched from one transmitter to the other. The process can be a bit tedious, but it is definitely worthwhile. You do not want to give your student control of an untrimmed airplane.
Lee and I then logged several flights while trading roles as the instructor and student. This allowed us to verify that the complete training system performed as expected. We transferred control back and forth and made sure that the transitions were seamless. We also practiced until we could actuate the necessary switches by feel. Another important task was measuring our flight times so that we could know how long to set the timer for flights under actual training conditions.
Despite our preparations, we did have a puzzling issue pop up during AirVenture. One of the AeroScouts suddenly became extremely docile. It had almost no elevator movement, which made it a bit challenging to get around the pattern! The problem was that we had made an error when setting up the instructor transmitters. We neglected to assign the Auxiliary 1 channel (panic recovery) to a momentary button, as instructed in the AeroScout’s manual. Instead, this function was set to a two-position switch.
When that switch was inadvertently moved during a flight, the airplane was in a constant state of panic recovery. That was a real headscratcher for a few minutes. The lesson here is to be thorough and trust the instruction manual.
Execute
The final element of being a better instructor is to utilize the tools that you have given yourself. That seems self-evident, but things have a way of getting forgotten in the excitement of the moment. You will probably be addressing a lot of questions from your student just before a training flight, and it’s easy to overlook the questions you should be asking yourself. The best way I know of to mitigate this situation is to have a checklist.
Lee and I came up with a checklist for the AeroScouts that covers the things that we think are critical to a successful training flight. In the world of full-scale aviation, they say that checklists are written in blood. The implied meaning is that every step on a checklist is there because someone was injured (or worse) when they didn’t do that task. Although less gruesome, the same is true of this checklist. Every item on the list represents a dumb or lazy thing we’ve done that negatively impacted a training flight.
I attached a laminated copy of the checklist to each of the instructor radios. Initially, I would quickly work through the checklist myself to verify that the airplane and radios were ready for a training flight. More recently, I’ve begun enlisting my students to help with the checklist. There are multiple benefits to this approach.
First, having two people involved makes it less likely that a step will be skipped or glossed over. Working through the checklist also demystifies the functions of many switches on the transmitter, which most new pilots are intimidated by. Finally, understanding the intent and importance of the checklist builds good preflight habits for them and for me.
Be Ready
Now that I have started using these strategies, I consistently feel better prepared for training flights. I know that the equipment is ready, so I can concentrate on giving the students a positive experience. Frankly, that makes things more fun for me as well.
Before your next session as a flight instructor, consider what you can do to prepare for success.
SOURCES:
EAA AirVenture Oshkosh
Green Bay Model Airplane Club
Horizon Hobby
HobbyZone


Comments
Add new comment