
Photos by the author and Ron Hull
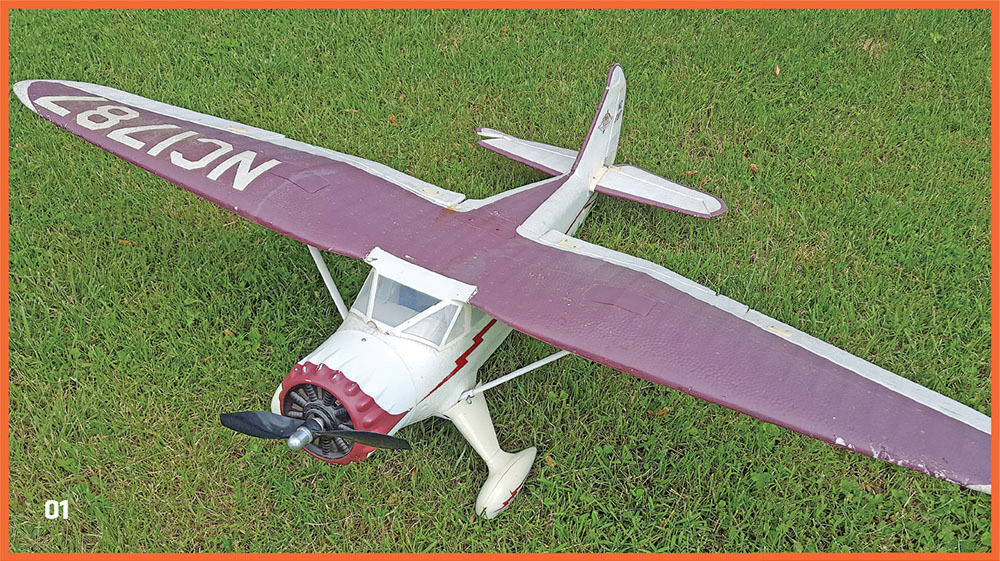
Do you want to start a new project, but you don’t feel like building from scratch? Or maybe you are modeling on a budget. In either case, refurbishing a used model from a swap meet might be just the project you are looking for! A promising candidate to refurbish can be found for a very reasonable cost at almost any swap meet or through other outlets, such as Facebook Marketplace. For this example, I was able to locate a very well-used ParkZone Stinson Reliant SR-10 at the Toledo R/C Swap Meet & Expo for less than $50.
Be Prepared
The first thing that you need to do before purchasing the aircraft is assess its condition. How much structural damage, if any, does it have? Are any of the electrical components broken or missing? How extensive is the cosmetic damage?
My Stinson was acquired in a complete BNF state, with all electronics in operating condition. The airframe appeared to have had some minor repairs from previous incidents, but they all seemed solid. There was also some damage to the tail surfaces from hangar rash.
Cosmetically, the Stinson was dirty and sun-faded. The white plastic parts were yellowed because of age, and it also had a few minor dings in the foam. Overall, I thought that this model was a great candidate for a total makeover at a very reasonable cost.
The supplies that are required for doing a project such as this are minimal, and most modelers will already have these items on hand. You will need basic modeling tools: a razor knife, screwdrivers, hex drivers, sandpaper, and sanding blocks. Miscellaneous bits of balsa, plywood, and plastic might be helpful as well. For finishing, a lightweight spackling compound will be needed.
The painting process will vary depending on what type of paint you prefer to work with. I will often use a variety of paints depending on the specifics of the project. My go-to paint for this type of project is latex interior house paint. It is inexpensive, easy to work with, and has a very low odor. I get color samples custom mixed at my local hardware store for approximately $4. One sample is plenty for a project of this size. Other options include craft paints and the traditional Rust-Oleum or Krylon spray paints.
You will need a primer that is compatible with your paint of choice. I have found that a spray can of high-build automotive primer works very well in most applications. It tends to bond well with the expanded polyolefin (EPO) foam that is used in many ARFs and makes an excellent base for most top coats.
Another item that is not necessary but will take your project to another level is a vinyl cutter for making custom decals. I have had mine for a number of years and it has paid for itself many times over. In the absence of a vinyl cutter, you can hand-cut decals or farm the task out to a professional cutter, such as Callie Graphics.
Getting Started
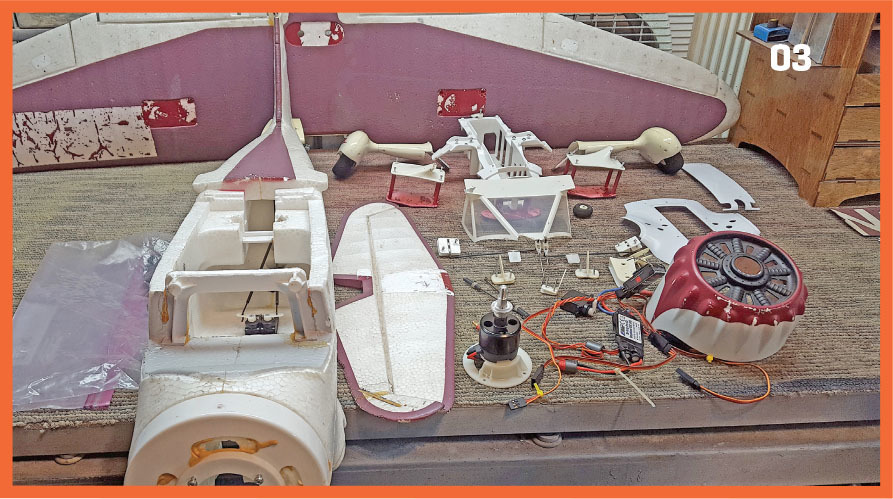
Start the transformation process by disassembling as much of the model as possible. It is a good idea to take photos so that you can reference how things are supposed to go back together! Remove all of the electronic components, control horns, and the pushrods, and then unbolt the tail surfaces, if possible. The more that can be removed, the easier the process will be. I place all of the small pieces and hardware in a Ziploc bag to keep them from getting misplaced.
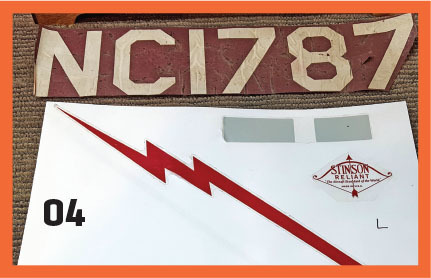
After all of the major components are removed, it’s time to clean everything thoroughly and to remove any decals. Most of the time, the decals can be peeled off with little to no damage to the model. I try to save any decals that I am going to replicate by sticking them to plain copier paper so that I have a reference when I cut the replacements.
I have had good results cleaning the foam with a foaming bathroom cleaner and a soft toothbrush. I then thoroughly rinse it with water to remove any residue.
Note any areas that are damaged and repair them as needed. Small chunks of missing foam can be replaced with pieces cut from destroyed models, packaging material, or even spray foam. Epoxy and Foam-Tac are ideal for these repairs because they remain slightly flexible. While CA glues might be compatible with the foam, they make for a hard joint that might be prone to failure.
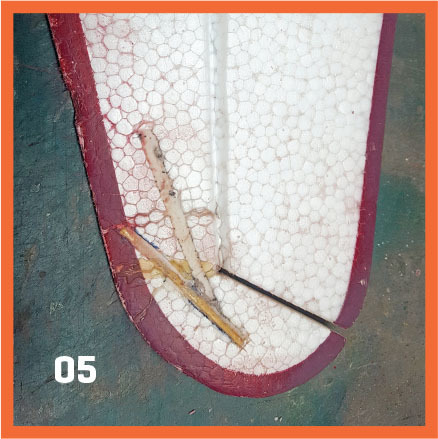
My Stinson had the most significant damage on the tail surfaces. Someone had previously repaired the elevator by cutting a groove and epoxying in a piece of balsa. While this repair was effective and allowed the aircraft to be flown, it wasn’t perfect. It moved the weak point farther down the elevator, and visually, it was not a good repair. I cleaned up the previous repair by sanding the high spots of the balsa reinforcement and adding filler to the low areas to get a smooth surface. I also added an additional piece of bamboo skewer to strengthen the elevator. Although the other side of the elevator did not have any damage, I applied similar reinforcements to that side as well.
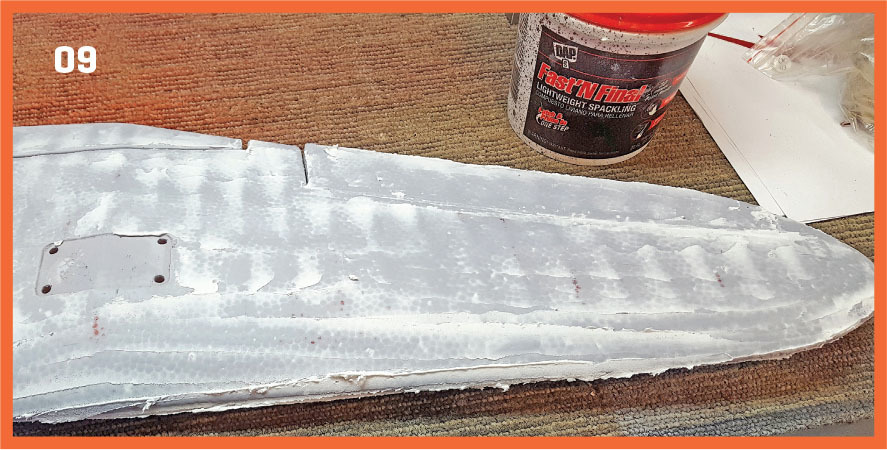
Once all of the repairs are made, it’s time to fill in all of the foam airframe’s imperfections with a lightweight spackling compound. This step usually takes the longest. It pays to not get in a rush because the quality of the finished paint job is heavily affected by how well the surface is prepped. I use DAP Fast ’N Final spackling compound, but any similar product will work just as well.
After thoroughly mixing the compound, I apply it to the model with an old credit card. If the mixture is too thick to spread easily, a few sprays of glass cleaner will thin out the compound. This makes it easier to spread and leaves a better finish. The idea is to just roughly fill in any damaged spots at this time.
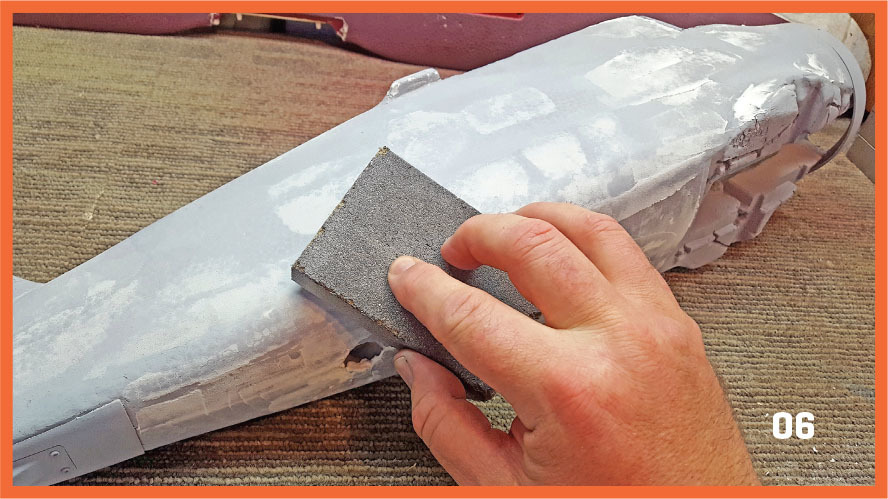
After leaving the filled-in parts to dry overnight, I sand the repaired areas with a medium-grit foam sanding block and a green Scotch-Brite pad. Light pressure works best to avoid gouging the foam. I apply another layer of filler to any areas that need additional work. Repeat as needed to get the desired finish.
Fresh Paint
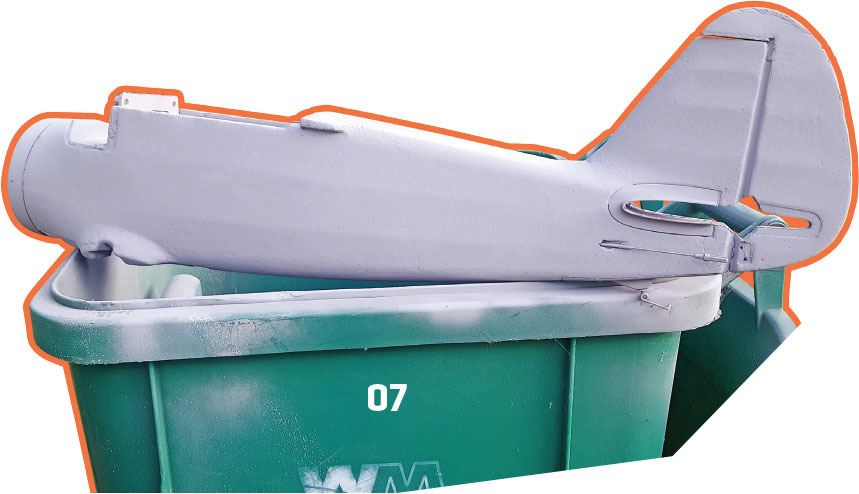
Once I think I have a majority of the large imperfections filled in and smoothed out, I give the entire aircraft a light coat of primer. It is very important to use a primer that is compatible with the type of foam of which the aircraft is made. If there is any doubt, always check in a spot that is not noticeable to see whether there is a reaction. I like to use an area that is inside the fuselage and will never be seen once the aircraft is assembled.
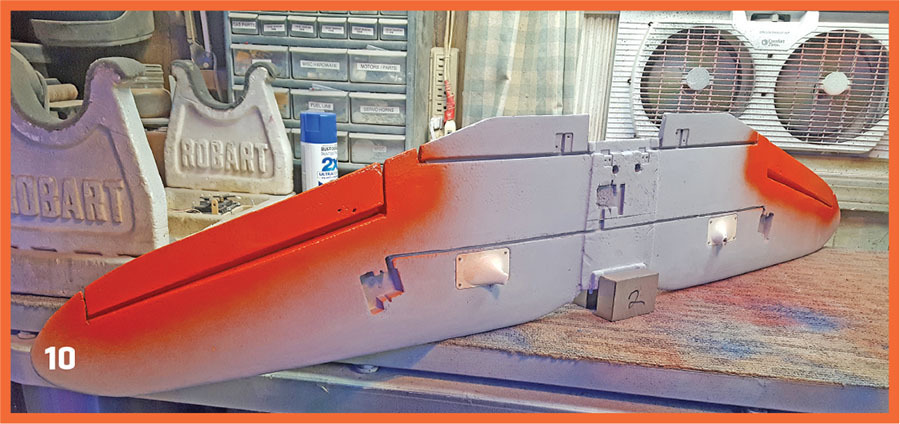
The primer accomplishes two things. First, it helps to identify any areas that need additional attention with spackle and/or sanding. Second, it gives the paint a uniform surface on which it can adhere. I have had very good luck using a light coat of Rust-Oleum high-build automotive primer. After the primer is dry, a light sanding will remove any overspray and even the surface.
After sanding, the entire surface should have a smooth and uniform look to it. Address any areas that have an uneven or blotchy-looking finish. Add more filler to any low areas and sand down the high spots. Recoat it with primer until you are satisfied with the surface. This might take multiple attempts, but it will greatly affect the quality of the finished project. It’s well worth the time to get things perfect.
Unfortunately, after the Stinson’s wing was primed, it became apparent that there was a large amount of "alligatoring" (a rough, pebble-like texture) of the upper surface. It was most likely caused by this dark-colored aircraft being left out in direct sunlight for too long, which overheated the foam. This required that I coat the entire upper surface of the wing with a thinned layer of filler. A considerable amount of sanding and another layer of primer were also needed to reduce the surface imperfections.
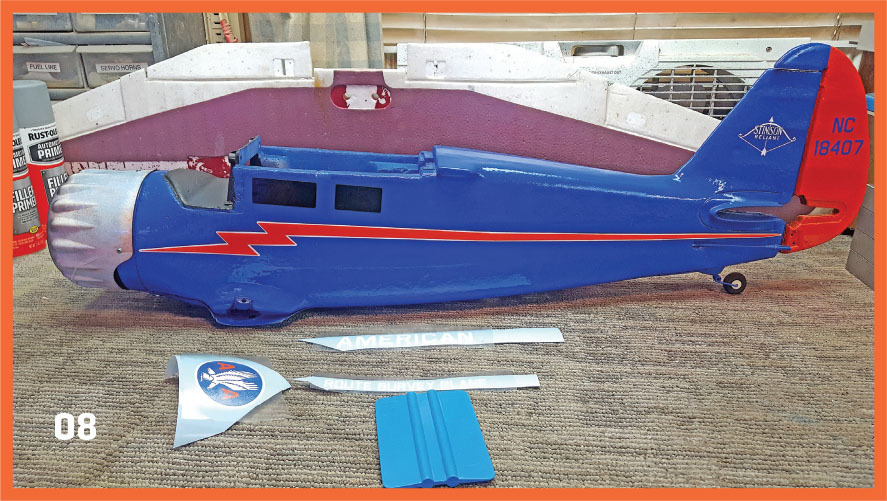
After you are satisfied with the surface, it’s time to start applying the color coats. I used Rust-Oleum-brand rattle cans on the Stinson as an inexpensive and convenient way to paint the aircraft. The drawback to using this type of paint is the amount of drying time. The paint has to cure for several days between coats for it to avoid blistering and ruining the finish.
Another thing to consider, especially when painting foam models, is your masking tape. You must use one that is high-quality and low-tack. Even blue painter’s tape can peel off the existing paint from a model. I have had excellent results using the various sizes of Tamiya-brand masking tape. It sticks well enough to not curl on its own, but it pulls off with little to no paint peeling. It also leaves a very crisp edge.
Small parts can be easily painted by attaching them to a piece of stiff cardboard with double-sided tape. Alternatively, they can be clamped in a pair of hemostats as a handle to make them easier to paint.
A small and often overlooked detail is painting the screws to match. I do this by drilling small holes into a piece of wood and partially inserting the screws. I then paint the screw heads with a matching paint.
Now is the time to start adding more scale detail to the model. Because of the Stinson’s smaller size, I didn’t want to include a lot of detail that would add weight to the airframe; however, the simulated radial engine that was molded into the cowling could easily be made to look much better by adding a little paint detail.
I painted the exterior of the cowling to match the fuselage. I then painted the entire inside of the engine area black, with the exception of the engine crankcase, which I painted gray. I used a dry-brushing technique to give the raised areas of the engine a natural, metal finish.
Dry brushing is a great way to bring out detail in items that are three-dimensional. My technique is to take a slightly stiffer brush and dip it into the paint that I want to use, and then use a paper towel to wipe the brush until almost no paint is left. I lightly pull the brush across the raised surfaces, leaving behind a trace amount of paint. If desired, the brush can be pulled across the surface repeatedly until the desired effect is achieved. This technique leaves the raised surface with highlights that "pop" out from the recessed areas, giving the object more visual depth and interest.
I painted the propeller an aluminum color. Tip stripes were added by masking off the desired area of the propeller and applying white spray paint. Some propeller manufacturer decals that I purchased on the internet were applied to it to finish off the detail on the front of the aircraft.
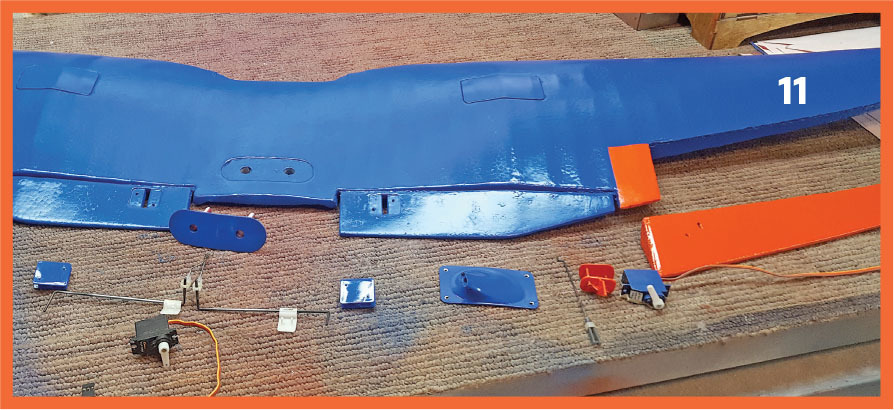
Reassembly
The part of these projects that I enjoy the most is reassembling the aircraft and applying the decals. It’s easy to get in a hurry at this time because the model will begin to look less like a pile of parts and more like the final product you envisioned. You must be patient and not rush. One slip of a screwdriver could send you back to the "fill with spackle" stage!
I made new decals for the Stinson by scanning the old ones that were attached to the copier paper. I manipulated the scans in the software that is used for my Silhouette vinyl cutter. Additional new decals were downloaded as images from the internet and altered as needed in the vinyl cutter software to size them correctly for the model.
Once all of the decals are applied, it’s time to double-check everything on the model. Make sure that the control throws amount is correct, as well as the direction, and that all fasteners are tight. Now is also a good time to make sure that the aircraft balances on the center of gravity as specified. You can then set aside some time to sit back and admire all of your hard work.
The Stinson project was a very straightforward refurbishment effort with nothing particularly difficult to refinish. The total cost, including the purchase of the aircraft, was less than $80. It took considerably less time to complete than building a new airplane, while also giving me a unique model that no one else has.
Hopefully this article will give you inspiration to get out there and "rescue" a previously loved aircraft and add another enjoyable dimension to your modeling career.
SOURCES:
Rust-Oleum


Comments
Add new comment