
Build a unique Rogallo wing for your Vapor
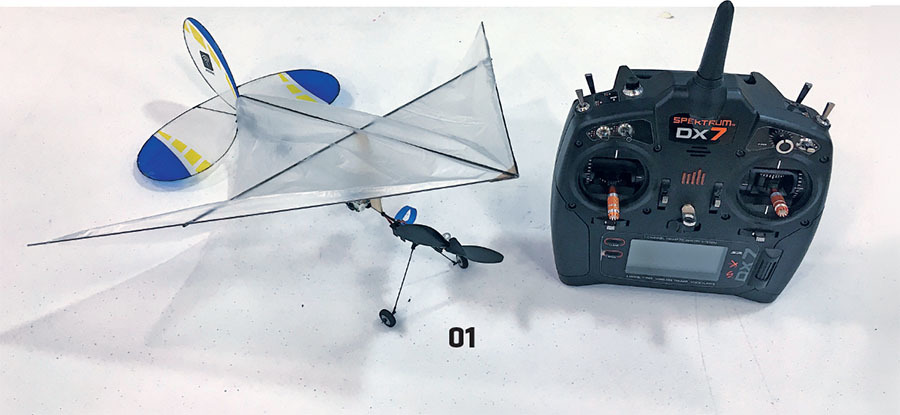
This second article in the ongoing "Vapor Mania" series should be of interest to quite a few Vapor fliers. Following the "Vapor Bash" articles that appeared in the February 2023 and April 2023 Model Aviation issues, I received numerous emails from builders who were interested in this fun modification. I’m speaking of the unique Rogallo wing. It’s a definite winning design that can get you back in the air in no time. It flies so well that you can’t help but be pleased.
Over in a Heartbeat
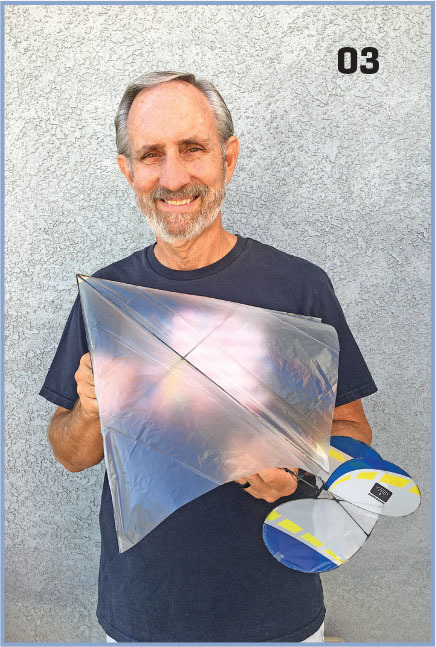
I saw it coming and instantly knew that it was going to be ugly. The pilot had made a perfect approach and beautiful landing; however, as he rolled out, he failed to see the descending RC helicopter about to touch down just ahead of him. It was over in a heartbeat. The poor little Night Vapor never stood a chance.
Shortly after that incident, the Vapor pilot approached me and asked whether I wanted what remained of his airplane. Naturally I said yes, but only if he allowed me to buy him breakfast. "Deal," he replied, and that’s how this opportunity presented itself to me.
My Opportunity
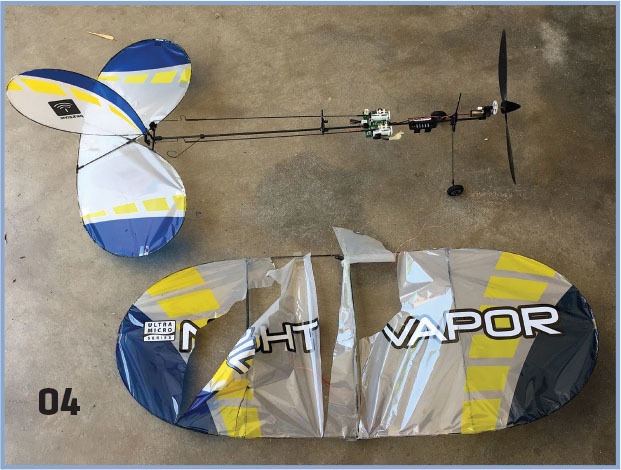
Upon inspection, I discovered that the wing had been cut in two and the covering was shredded. The wiring for the LED lights had been torn loose as well. Part of the landing gear was missing, and the rudder was sheared off at its base. The good news was that the electronics emerged undamaged and were in perfect working condition. Furthermore, the entire fuselage, including the motor assembly with the propeller, was also intact. It was then that the creaky wheels in my head once again began to turn.
Why Not a Rogallo?
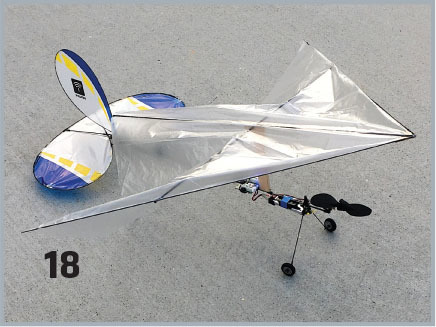
I soon realized that the only thing I couldn’t repair was the Vapor’s wing. That gave me the perfect opportunity to try a Rogallo wing on it. I mean, why not? Rogallos are very stable and super easy to build, and a Rogallo wing would be simple to attach to the Vapor’s fuselage. As it turned out, this idea lent itself perfectly to the Vapor and produced a really fun and easy-to-fly airplane.
Does this sound interesting and fun to you? If so, please read on and together we will build a new Rogallo wing for your Vapor!
What’s That?
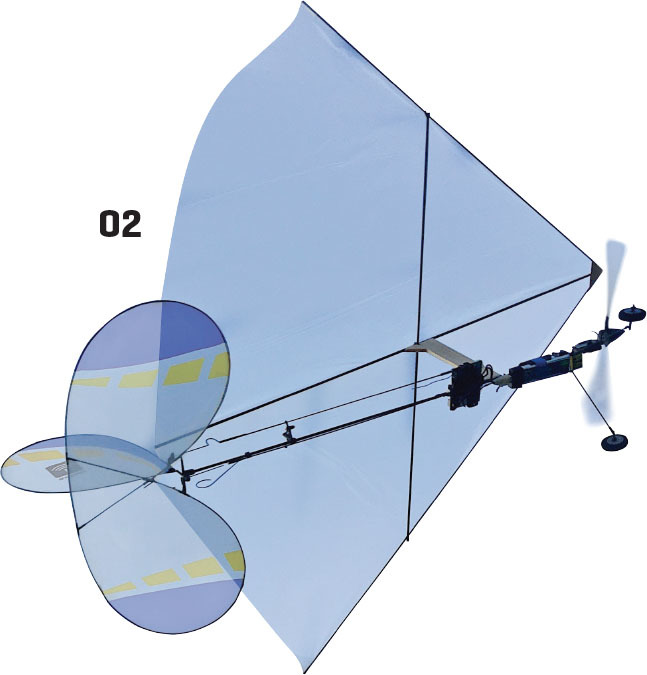
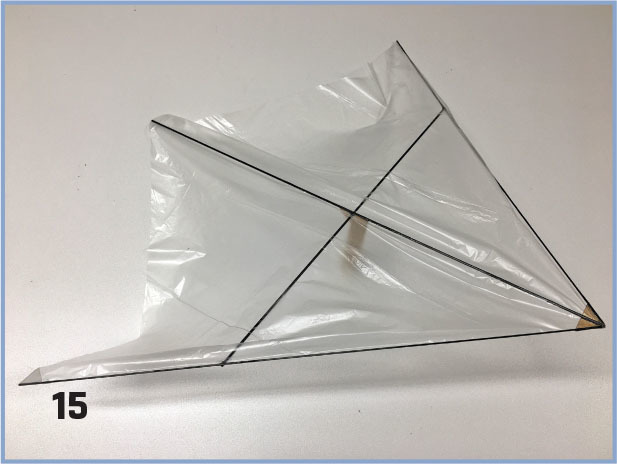
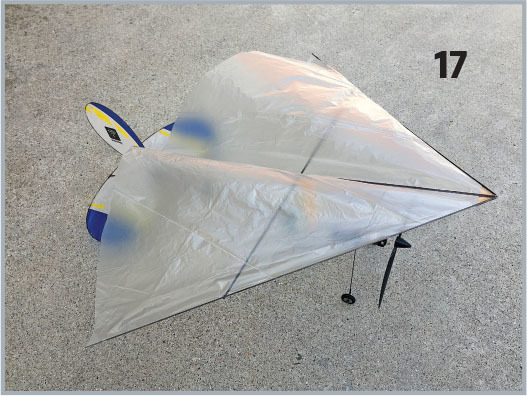
Are you unfamiliar with a Rogallo wing? Well, it’s basically a diamond-shaped wing with rigid, swept leading edges (LEs) and a rigid center keel. The covering is attached between the three but very loosely, much like a sail is attached to the mast and boom aboard a sailboat.
The Rogallo wing is set at a positive angle of attack and, as it moves forward, it "inflates" into two semiconical-shaped surfaces. As speed increases, it produces lift, just like a conventional wing. It actually is a very successful design, yet it looks really different.
Materials List
The assumption moving forward is that you have an intact Vapor fuselage with tail feathers and that the electronics function properly. The fuselage might be what remains from an accident or you might just want to purchase one and try something different.
Since you will only be replacing the wing, your materials list is short and as follows:
- 28 inches of .060-inch carbon-fiber rod
- 28 inches of .040-inch carbon-fiber rod
- 1-× 3-×3/32-inch piece of balsa
- 1-×1-×1/32-inch piece of plywood
- One translucent grocery store produce bag
- E6000 glue
- Xylene thinner
- Medium CA glue and kicker
- One roll of 1-inch Blenderm tape
And that’s it! This is a very quick build, so once you have all of the materials, you could easily complete this project in one evening!
Getting Started
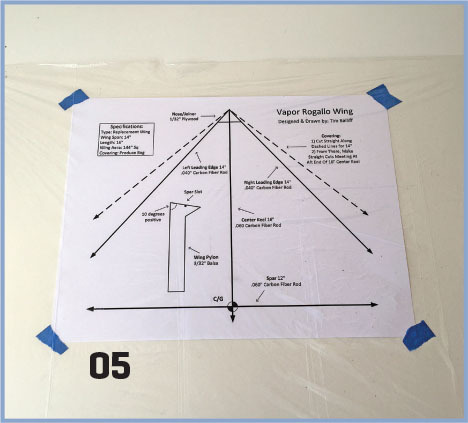
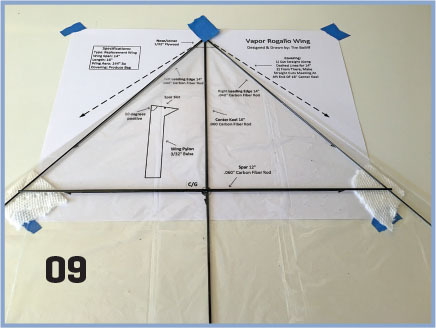
First, note that the wing is built upside down with the covering attached as you build. A digital PDF download of the plans is provided on the Model Aviation website, as well as plenty of construction photos. You will be building directly over the plans sheet, so start by downloading and printing it onto a single 8-1/2-×11-inch sheet of computer paper.
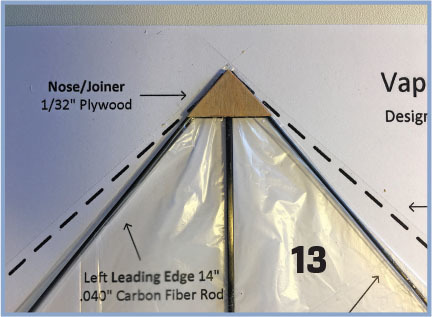
Next, tape the plans to a flat building surface with painter’s tape. Your Rogallo wing’s center keel is almost 16 inches long and your LEs are both 14 inches long. All three will extend off of the plans, so be sure to arrange your building space accordingly.
Wing Pylon
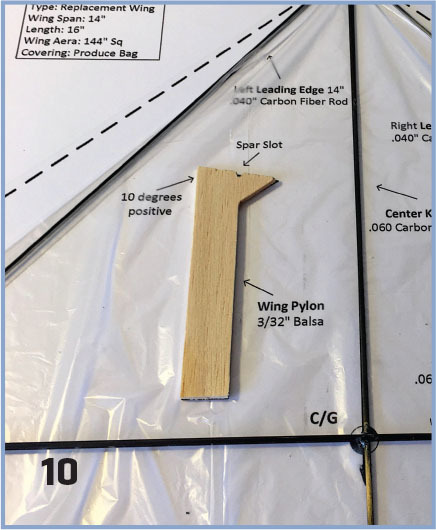
Let’s begin with the wing pylon. The plans sheet has a template that shows the proper shape and dimensions. It is simply cut from 3/32-inch balsa. The longest edge is the front and the wide top is cut at a positive 10° angle. Remember to cut/file the notch for the carbon-fiber spar. Lightly sand any rough edges and it’s done.
The Covering
Produce bags can be acquired at any grocery store—plus, they are free! Be on the lookout for the slightly translucent variety because those are the ones you want. Completely transparent bags are made of a type of plastic that shrinks significantly with ambient temperature change, which can be problematic, so it’s best to simply avoid them.
Back at your hobby table, cut your produce bag open and select which area you want to use. Neatly spread it over the plans, extending well off the sides and bottom. It won’t lay completely smooth and will likely have some creases. I ran my creases from front to back, but just do the best you can without stretching the material. Now secure the covering with tape and you are ready to go. Remember to use the photos along the way for clarity.
Time to Build
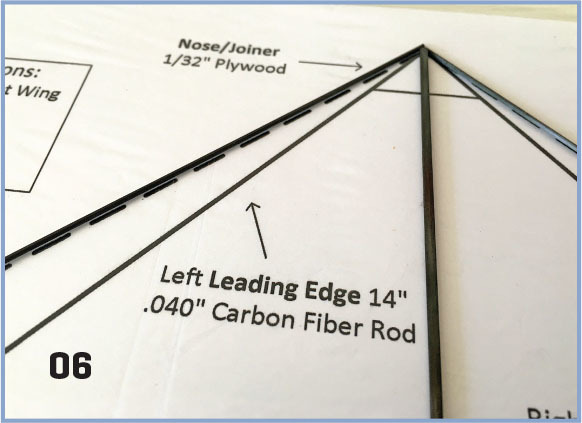
First, cut your .060-inch carbon-fiber keel and spar to length. Next, cut the two .040-inch carbon-fiber LEs. The lengths of each are indicated on the plans.
Now, in a small container, mix a fair amount of E6000 glue with a little Xylene. You want the consistency to be about as thick as maple syrup. Without thinning it, the E6000 will skin over almost immediately and become stringy and difficult to work with. Both were purchased at the same local hardware store.
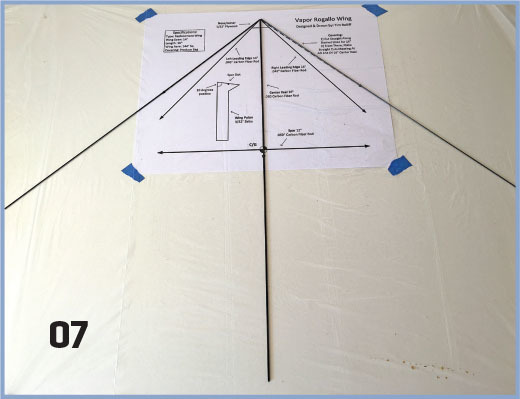
Using a small applicator (a cheap paint brush or a Q-tip), spread a liberal amount of thinned glue along one side of your carbon-fiber keel. Now carefully lay the keel over the plans, where indicated, with the glue side down. Avoid getting glue elsewhere on the covering material. When it’s placed properly, expect your keel to extend off of the plans but still be on the covering. Press it down firmly as it rapidly begins to dry.
Now do the same for the two LE pieces. Note that you will be placing them on the dashed lines. Allow them to touch the front of the center keel, but don’t glue them together. Again, expect the LEs to extend off of the plans but still be on the covering. Remember to press down firmly as the glue sets. Now allow everything to dry for approximately 15 minutes.
Moving Along
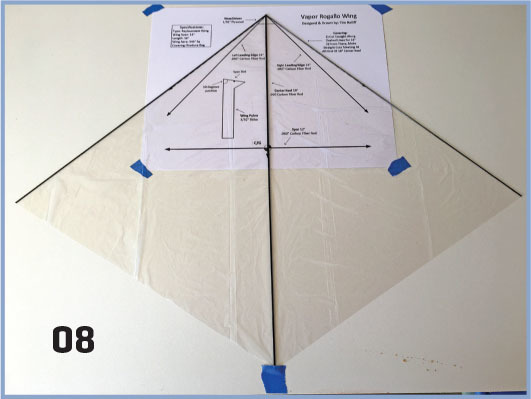
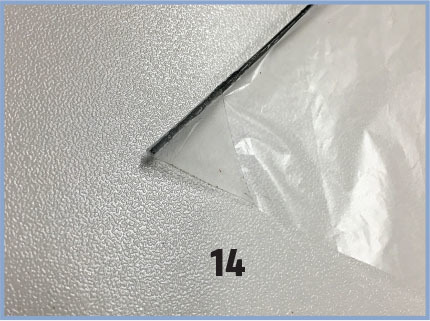
After the glue has dried, use a straight edge to cut the produce bag material along both LEs. Don’t cut directly against the LEs; rather, leave about 1/16 inch of covering material. Cut from the aft end of each LE rod to the aft end of the keel. Remove and discard any unused covering material.
Now carefully lift the aft end of the LE rods and pivot them onto the solid LE lines on the plans. As you do so, be sure that the top, uncovered surfaces of the carbon-fiber rods remain facing up. Once they are in position, use two small pieces of painter’s tape to hold them in place.
Next, use medium CA to glue the carbon-fiber spar onto the center keel and both LEs. It doesn’t take much, but make sure that the spar stays in contact with both LEs as the glue dries. I also suggest that you use small pieces of paper towel under the spar and LEs to protect the covering from any CA.
Finally, cut the¾-inch wide × ½-inch tall plywood nose/joiner and sand a small groove along its 1/2-inch centerline. Now CA-glue the joiner into position, with the groove side down, onto the keel and both LEs. As the glue sets, make sure that the joiner remains in contact with the two LEs. You might need to hold slight downward pressure on the outside edges of the joiner. Using kicker would be a good idea as well.
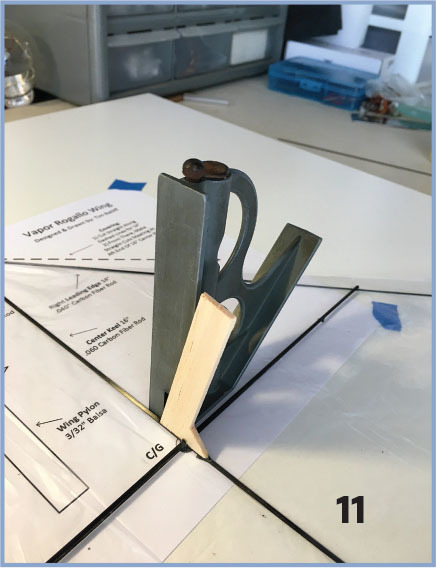
Wing Pylon
With the wing remaining upside down on the work surface, again use medium CA to glue the balsa wing pylon (also upside down) into position along the keel. The photos will be of great help here. Remember that the longest edge of the pylon top is the front and the spar should easily fit into the slot. As the glue sets, make sure that the pylon remains aligned with the keel and perpendicular to your work surface.
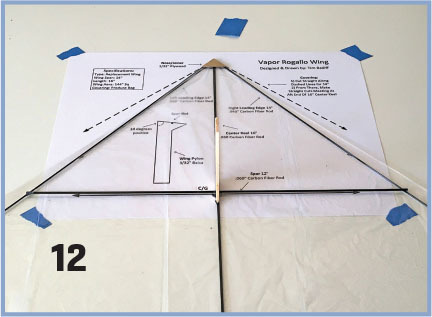
After the glue has dried, remove any painter’s tape, lift your nearly completed wing off of the board, and then use a slight amount of the thinned E6000 glue to adhere the 1/16-inch strip of loose covering material along the LEs. Once the glue has dried, use small pieces of Blenderm tape to reinforce the vulnerable tips of the LEs and keel. That’s it! Your Rogallo wing is finished!
Attach the Rogallo Wing
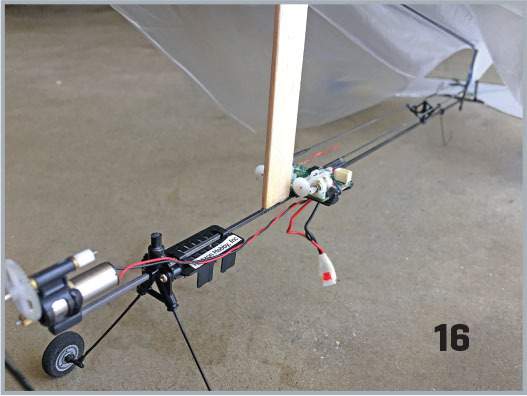
It’s almost time to attach your new wing to the fuselage, but first remove any old carbon-fiber wing posts that remain. Make sure to leave the plastic attachments on the fuselage because they serve double duty.
Now, put a modest amount of medium CA on the bottom of the wing pylon. Next, carefully position it onto the top of the fuselage, immediately ahead of the receiver unit. Be advised: It is vitally important that you do not get any CA on the gears that protrude from the front of the receiver unit. Although you will be working in close quarters, it is very doable. Just take your time and be careful. As the CA sets, the post should stay vertical and the keel remain in line with the fuselage centerline.
It’s Time to Fly
Now the real fun begins—it’s time to go fly! As with any Vapor, your Vapor Rogallo is best suited for indoor flying. With that said, you can also fly outside in calm weather.
At the flying site, run through your preflight checklist. If everything functions properly, check the center of gravity. Your Vapor Rogallo should balance right on the spar. If all looks good, it’s time to get airborne.
To take off, give your airplane full throttle. As it accelerates and you see the wing inflate, apply and hold up-elevator. When it lifts into the air, relax the elevator and allow it to gently climb out. When you’re at a comfortable height, reduce the throttle and trim for level flight. As with most RC airplanes, throttle management is important. There is that sweet spot where your airplane will settle in and handle really nicely.
You will find that your Vapor Rogallo flies very much like an original Vapor, but it looks really different in the air. You might also find that it is a bit more stable than the original. That’s the nature and beauty of Rogallo wings!
One thing to remember is that all of your maneuvers should be positive G. The reason is because, if your Rogallo wing "deflates" during a negative-G maneuver, it might be difficult to recover in time. If it’s too low, it could prove disastrous. With that being said, keep the nose up and you’ll have no trouble. In fact, you might be surprised at just how high the nose can come up and how slowly you can fly. Try some "high-alpha" turns as well.
When it’s time to land, simply cut the power, glide down, and flair. You are almost guaranteed to make a nice, gentle landing. With a little practice, you can even do nose-high, parachute-type descents all the way down to landing. Now that’s fun!
Pilots’ Lounge
The new Rogallo wing really makes your Vapor easy and great fun to fly—not to mention, it’s unique! I’m sure you did an excellent job, my friend. Your pilot buddies might have a few questions for you, so be prepared for some fun conversations.
I hope you enjoyed building and flying your new Vapor Rogallo. I wish you exciting flights and many happy landings. Until next time, stay safe and stay well. Fun stuff …
SOURCES:
Horizon Hobby


Comments
Add new comment